Instructions
1. Foundation
2. Hearth and Hearth extension
3. Building the Firebox
4. Setting Bob Hart’s Rumford Fireplace Forms in Place
5. Pouring the throat and lintel
6. Transition to flue
7. Chimney
8. Top Mount Damper
9. View Fireplace Materials
10. View Estimated Costs
(Click each picture to see it full size, then use your Web browser’s Back button to return to this page.)
Foundation
As with any masonry chimney, the foundation should be adequate to support the weight of the entire fireplace/chimney system that will be sitting on it. Foundations should be built according to local building codes and/or NFPA 211 and shall be built on masonry, concrete or other noncombustible material. When building the foundation consideration should be made for the height of the hearth and hearth extension. If the finished hearth height is to be equal to the finished floor height, the foundation for the fireplace should be adjusted accordingly.
Hearth
The hearth of the firebox is the floor of the firebox. On the foundation, lay out the firebox floor 10 inches larger than the size of the firebox. Allow for the wall thickness of the firebrick that you will be using on the side and back walls of the fireplace. The end of each firebrick should line up with the centerline of the firebrick in the next row. Once satisfied with the layout, set the firebricks level in a bed of masonry mortar to form the floor (hearth).
Hearth Extensions
Hearth extensions should be built according to local building codes and/or NFPA 211 in size and materials
Building The Firebox
With the fireplace hearth firebrick (floor) mortared in place, lay out the side walls and back wall. Bob Hart’s Rumford Fireplace Forms are designed for three standard firebox sizes. 36, 42, and 48 inch wide openings. The recommended dimensions for the Hart-Rumford Fireplace are;
Depth of firebox = 1/2 width of opening
Width of back wall = 1/2 width of opening
Height of fireplace opening = width of opening
 In the example shown the front opening is 36” wide, therefore the back wall will be 18” wide. And the firebox depth is 18”.
At this point you need to decide if the firebrick will be laid with it’s wide (4 1/2” face) surface down, called a stretcher, or it’s narrow (2 1/4” edge) surface down, called a shiner. I prefer to build all of my fireboxes with the face down (stretcher). Laying the bricks flat uses twice as many brick but I feel it’s worth the extra time and expense to achieve a longer lasting firebox.


It is very important that each brick is laid level, plumb, and straight.
 Where the sides walls and back wall meet, the corners should intertwine and overlap each other for the most strength, or for ease of replacement the sides and back can butt up to each other. A brick saw is very useful and makes a cleaner looking job, but if necessary use a brick hammer and chisel to make the needed cuts.


The outside walls can be brick, block, stone or concrete. Fill all voids with regular mortar.
Setting The Hart-Rumford Fireplace Form in place
Protect floor if necessary.
Bolt the 2-part legs together, lay one leg of the form in front of and on each side of the fireplace opening with flat side down and multiple flange holes facing each other (facing center).
Bolt the two 12” x 48” center plate pieces together to form the 24” x 48” center plate. Lay the center plate face down between the two legs.
Measure from the far end (bottom) of the legs and adjust the bottom of the center plate to the desired height of the fireplace. Then install three 1/2”x1” bolts and nuts on each side connecting the center plate to the two legs.

![]() Slide the appropriate size breast plate (36, 42, or 48” wide) under the form. Align the three holes and bolt the breast plate to the center plate using the three 1/2” x1” bolts and nuts provided.
Slide the appropriate size breast plate (36, 42, or 48” wide) under the form. Align the three holes and bolt the breast plate to the center plate using the three 1/2” x1” bolts and nuts provided.
Next, slide the rear support pipe through the collar on the top of the breast plate until the bottom of the  support pipe is approximately even with the bottom of the form legs. Then tighten the handle bolt against the support pipe.
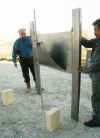 Now with a helper, one person on each side of the form, stand the form up.
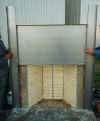 Set the form against the facing with a leg on each side of the fireplace opening. With two ratchet straps, secure the forms to the fireplace. Insert the hooks of the straps into the convenient holes in the outside flanges of the form legs.
 The breast plate should now be sloping upwards inside the fireplace opening.
Adjust the rear support pipe to the desired height and tighten the handle bolt 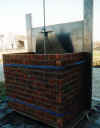
 securely.
A block of woof can be inserted between the top of breast plate and center plate if it is desired to have a deeper throat.
The Bob Hart Rumford fireplace form is now in place.
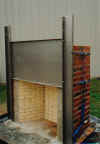
Next continue laying up the firebrick following the edge of the breast plate and setting each firebrick back from the front of the brick beneath it. Use the breast plate as a guide as to how far to set each brick back. See Photo.
 Continue until you reach the top of the breast plate. The back wall remains straight and the side walls narrow as you follow the breast plate to the top of the form.
Next build the outside walls of the fireplace to the same height. Fill all voids with brick and regular mortar. Secure the top of the form with a third strap.
Pouring the throat and lintel
Spray releasing agent, or apply a light coat of oil on the inside of the forms wherever the forms will contact masonry.
Mix 1 bucket of Chamber-Tech 2000 according to directions on the bucket.
 Apply the C-T 2000 to the breast of the form approximately 1 1/2 – 2” thick.
Make sure there are no voids or air pockets if possible. Tap carefully and lightly on the bottom of the breast  form with a rubber mallet so the C-T 2000 will settle and fill voids.
Mix and pour approximately 3 inches of fiber  reinforced concrete on top of the C-T 2000.
Cut 3 pieces of #4 (1/2”) rebar 12” longer than the width of the firebox opening and lay them in  the concrete you just poured. Put the rebar at different levels in the throat being poured.
Fill the throat to the top of the breast plate with 
 concrete. Tap lightly again with a rubber mallet along the bottom of the breast plate to eliminate any voids and air pockets.
Leave forms on for at least 24 hours.
Remove the Form
Remove the straps from the forms.
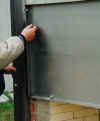
 Remove the bolts from the legs and center plate and remove the legs.
Remove the bolts that connect the center plate to the breast plate and remove the center plate.
With someone holding the breast plate, unscrew the handle bolt and lift the rear support pipe out of the collar on the breast plate.
 Let the breast plate down into the firebox and the forms are off.
Thoroughly clean the forms and store them away for their next use.
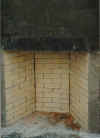
The following photo’s show the fireplace with the forms removed. You can see the layer of C-T 2000. It goes all the way to the top of the breast on the inside.
Transition to flue
With firebrick and refractory cement build the transition from the top of the breast plate to where the chimney flue will begin. The firebrick walls in the transition section should be at least 8” thick. Normally the transition can be finished in 3-5 rows of firebrick – depending on the size of flue and type of chimney you will be using.
Chimney
After the breast and lintel has set for at least 24 hours, remove and clean the forms so they are ready for the next fireplace. If building one fireplace above another, the same form can be used.
Any type of chimney can be used, provided the footing and foundation is adequate to support it, and it meets the requirements of the authority having jurisdiction.
If using clay flue tiles, the inside dimensions of the top row of firebrick should be equal to the inside dimensions of the flue tile.
If using a listed factory built metal chimney system, the inside dimension of the top row of firebrick should be just large enough to accept the collar of the chimney adaptor plate. Then the adapter plate should be attached to the top row of firebrick with the approved bolts or anchors.
To determine proper sizing of the flue, please be aware of the following recommendations:
Round flue– no less than 1:17 flue/fireplace opening ratio
Square flue– no less than 1:12 flue/fireplace opening ratio
Rectangle Flue– no less than 1:10 flue/fireplace opening ratio
| Minimum Flue Size (inside dimensions) | |||
|---|---|---|---|
| Opening | Round | Square | Rectangle |
| 36 | 10" | 11"x11" | 9"x15" |
| 42 | 12" | 12"x12" | 11"x16" |
| 48 | 14" | 14"x14" | 13"x18" |
Dampers
In an effort to keep the throat as smooth and clear as possible, I highly recommend the use of top sealing dampers. Top sealing dampers also help keep the flue warmer resulting in increased draft in fireplace startup situations. If using a factory built chimney system, it may be necessary to use a throat damper. We have developed one that can be built into the fireplace/flue transition area. Call for pricing.
Bob Hart’s Rumford Fireplace Forms-parts
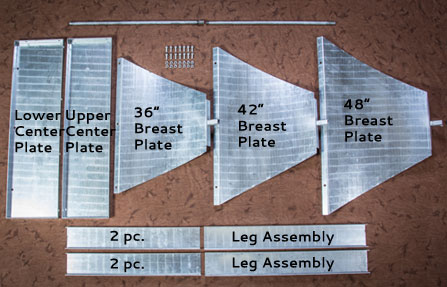
By using the Hart-Rumford Fireplace Forms, you can be assured that you are building quality fireplaces that you can be proud of.


